

Escape from Tarkov: Luxurious Life quest walkthrough
Learn how to complete the Luxurious Life quest for Prapor in Escape from Tarkov, locating the liquor store and extracting the hard-to-find wine with ease.
This is part of the ‘Escape From Tarkov’ directory
Directory contents
-
Anesthesia
-
Beyond the Red Meat Part 1
-
BP Depot
-
Burning Rubber
-
Checking
-
Chemical Part 1
-
Classified Technologies
-
Corporate Secrets
-
Delivery from the Past
-
Drug Trafficking
-
Energy Crisis
-
The Extortionist
-
First in Line
-
Grenadier
-
Gunsmith Part 2
-
Gunsmith Part 3
-
Gunsmith Part 9
-
Gunsmith Special Order
-
Hot Delivery
-
Introduction
-
Letters
-
Luxurious Life
-
Out of Curiosity
-
Pharmacist
-
Rough Tarkov
-
Saving the Mole
-
Search Mission
-
Seaside Vacation
-
Shooting Cans
-
Shortage
-
Stray Dogs
-
The Walls Have Eyes
-
What's on the Flash Drive
-
Exit Here
Luxurious Life is the toughest of Escape from Tarkov's opening Ground Zero quests, so this dedicated walkthrough will definitely come in handy. Follow all of the steps and tips below to locate and extract the wine with ease!
How to complete Luxurious Life
All you need to do to complete Luxurious Life is locate the liquor store on Ground Zero, locate the Bottle of Le Jean wine within the store, and then extract safely to hand it over to Prapor.
While this might seem simple enough, it's trickier in practice due to the challenge of finding the bottle and staying alive during the process. The bottle has a number of different spawns, and due to the nature of the liquor store, it's a bit like searching for a needle in a haystack.
Where to find the liquor store
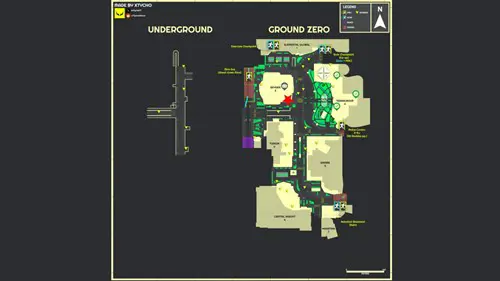
The liquor store - officially known as ASAP Winery - is found within the Skyside building, which is in between Fusion and the Emercom Checkpoint, and opposite the TerraGroup building.
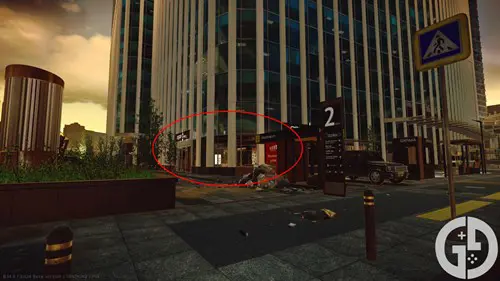
It's thankfully on street level, and adjacent to the side ramp, so is easy to find and enter. However, you're left quite exposed while inside due to the mostly glass construction, so be aware of your surroundings as you're hunting for the wine bottle.
Where to find the Bottle of Le Jean wine
Now for the tricky bit, as the Bottle of Le Jean wine has a number of different potential spawns, and isn't particularly visually distinct compared to the numerous other wine bottles in the store.
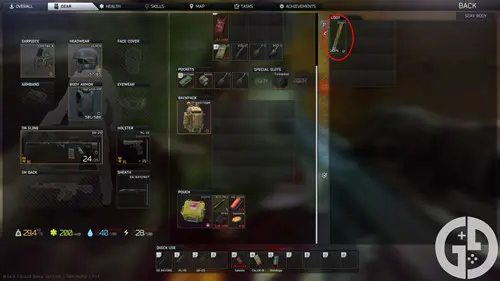
The bottle itself is green with a red top, has a ballerina drawing on the front, and will show up as 'Wine' when you go to pick it up. Here are all of the potential spawns that you'll want to check:
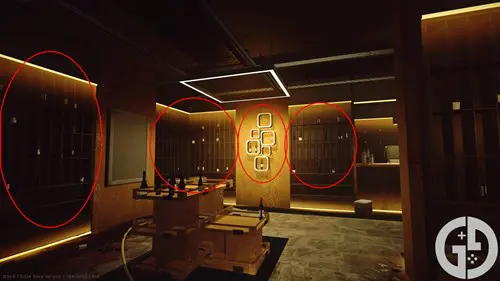
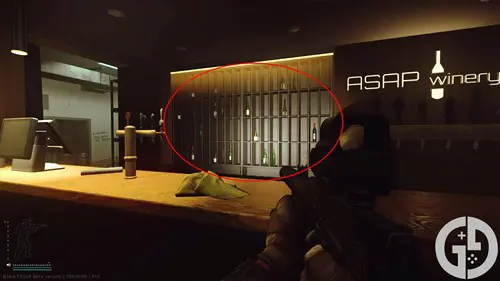
Central stand by the main bar
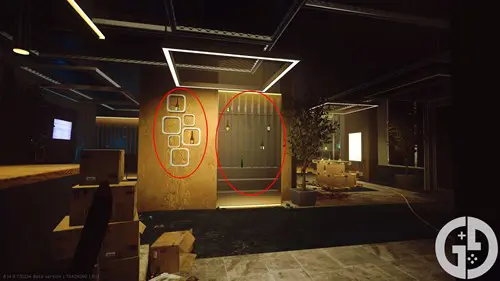
Heading into the heart of ASAP Winery you'll find a display stand to the right if you're facing the main bar. As you'll find with most of the spawns, you'll want to check the thin stacked shelving and the white square-boxed shelving for the bottle.
Left of the bar
The shelving to the left of the main bar is also a potential spawn area, and this is where I found the bottle when I first completed the task.
I'm not sure how far the spawn area stretches around here, but I'd make sure to check all of the stacked shelving around the back wall too - just in case!
Behind the bar
There are also some shelves behind the main bar itself that you'll want to check. There are quite a few bottles to check through here, so make sure that you've scanned over each one just in case Le Jean is hiding in plain sight.
In the storage room
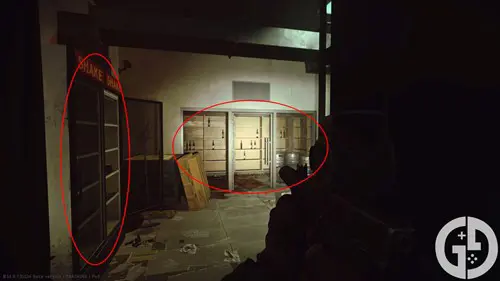
Finally, the last potential spawn is in the storage behind the bar area. As far as I can tell based on experience it only seems to spawn in the dedicated storage room with the wooden shelves, but it's still worth checking the 'Shake' fridges to the left too if you still can't find it.
This is the other place where I found the bottle on my PvE character, which was a big relief after checking the entire store beforehand! Do be wary though as there is a connection to the main Skyline building in this room, and Scavs or other PMCs can sneak up on you if you're not careful.
Best extraction plan
You've got three options when it comes to extraction, and it generally depends on your given extract, and then the status of your other quests.
Emercom Checkpoint
If you're lucky enough to have the Emercom Checkpoint extract then that's the one to go for, as you're fairly close and it's the most reliable option. You'll want to head through the double door in the storage room behind the bar, which takes you into the main Skyside building.
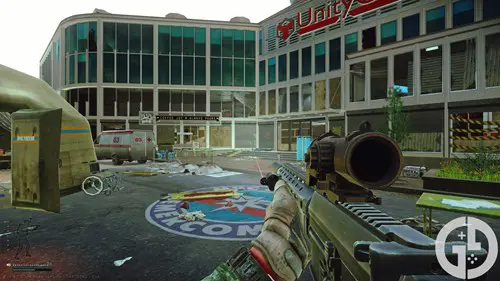
From there, continue out of the building and head towards the Unity Credit Bank, which you'll hopefully be familiar with at this point. At the doors beyond the tent here is the Emercom Checkpoint, so head in the general vicinity in order for the extract to trigger.
Mira Ave
If you're unlucky enough to have Nakatani Basement Stairs as your main extraction point, you're actually better off going for the Mira Ave extract as it's much closer and safer to reach.
Head out the side of ASAP Winery and head right down the highway ramp. You should then reach a new road at the end, where you'll want to again turn right.
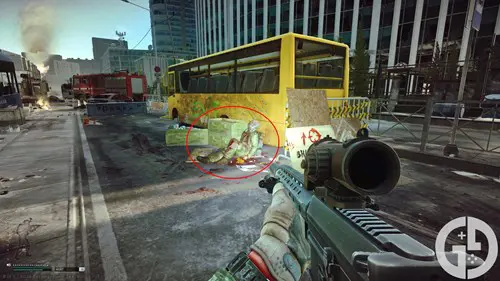
There should then be a large yellow bus stationed on the road, and a dead Scav lying against its side. Loot the Scav and there should be a Green Flare, which is guaranteed to spawn every raid. If the Flare isn't there then someone else has already picked it up - so if that is the case hopefully they've already opened the extract.
If you've got the Flare yourself though, make sure to walk just a bit down the road until a message regarding the Flare pops up in the bottom right of the screen. Then, look directly up and fire the flare into the sky.
Once the green becomes visible you should be able to continue forward and the extraction will be open. You must make sure that the flare is shot as high as possible though, as otherwise it won't trigger and you'll be shot by the sniper instead.
If the Flare wasn't on the Scav body you can check whether the extract is open by looking for the message in the bottom right of the screen. If it doesn't appear then you're all ok, but if it comes up saying 'no flare' then back away and make your way to another extract.
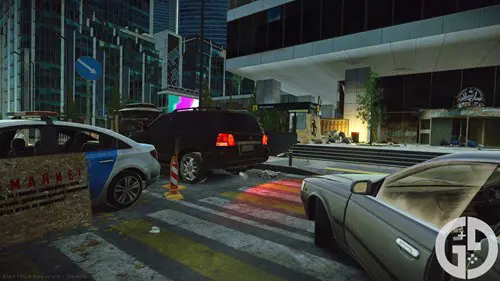
Police Cordon V Ex
I'd generally only go for the vehicle extract as a last resort in this scenario, unless you've not already completed the Burning Rubber quest from Skier.
Not only do you need to prepare ahead and ensure that you've brought in 5,000₽ for the car, but you also leave yourself extremely exposed while waiting for the timer to tick down.
Additionally, there's also a significant chance that the car isn't even there, leaving you in a tricky spot. If you've not got Emercom as your main extract, the Green Flare isn't at Mira Ave, and you've already completed Burning Rubber, I'd simply just head to Nakatani - unless you're really desperate for some Scav Karma!

About The Author
Harry Boulton
Harry is a Guides Writer at GGRecon, having completed a Masters of Research degree in Film Studies. Previously a freelance writer for PCGamesN, The Loadout, and Red Bull Gaming, he loves playing a wide variety of games from the Souls series to JRPGs, Counter-Strike, and EA FC. When not playing or writing about games and hardware, you're likely to find him watching football or listening to Madonna and Kate Bush.
This is part of the ‘Escape From Tarkov’ directory
Directory contents
-
Anesthesia
-
Beyond the Red Meat Part 1
-
BP Depot
-
Burning Rubber
-
Checking
-
Chemical Part 1
-
Classified Technologies
-
Corporate Secrets
-
Delivery from the Past
-
Drug Trafficking
-
Energy Crisis
-
The Extortionist
-
First in Line
-
Grenadier
-
Gunsmith Part 2
-
Gunsmith Part 3
-
Gunsmith Part 9
-
Gunsmith Special Order
-
Hot Delivery
-
Introduction
-
Letters
-
Luxurious Life
-
Out of Curiosity
-
Pharmacist
-
Rough Tarkov
-
Saving the Mole
-
Search Mission
-
Seaside Vacation
-
Shooting Cans
-
Shortage
-
Stray Dogs
-
The Walls Have Eyes
-
What's on the Flash Drive
-
Exit Here


